

 Shimul Chowdhury
 Table of Contents
Toggle
Table of Contents
Toggle
Incorporating an events calendar on your website is a powerful way to keep your audience informed and engaged. The Events Calendar plugin is one of the most effective tools to seamlessly set up, organize, and manage events on WordPress. Whether you’re planning webinars, product launches, or in-person events, this plugin offers a complete solution to ensure your calendar remains clear and updated.
This guide provides a detailed, step-by-step breakdown of how to set up and customize the Events Calendar plugin, including a look at the events calendar override template and tips on how to create Calendly events if you need a more interactive scheduling option.
Introduction to the Events Calendar Plugin
The Events Calendar plugin is a widely-used WordPress solution for event management. Created by Modern Tribe, it provides essential features like calendar views, event categorization, and recurring events. Its versatility and ease of use make it ideal for any business looking to keep their customers updated on upcoming engagements. Whether you’re planning weekly meetings, workshops, or special events, the Events Calendar plugin offers essential tools for event organization and increased website engagement.
Why Use the Events Calendar Plugin for Your WordPress Site?
Benefits of Using an Events Calendar
- Enhanced User Engagement: Adding an events calendar encourages interaction, helping visitors to stay connected and informed.
- Streamlined Event Management: Automating event reminders and scheduling saves time and reduces errors.
- Versatile Use Cases: Ideal for businesses offering webinars, meetups, product launches, and more.
For businesses like yours, using an events calendar can increase website traffic and maintain strong customer engagement by keeping your audience informed on key dates and activities.
Step 1: Installing the Events Calendar Plugin
Walkthrough of Installation
- Log in to your WordPress Dashboard.
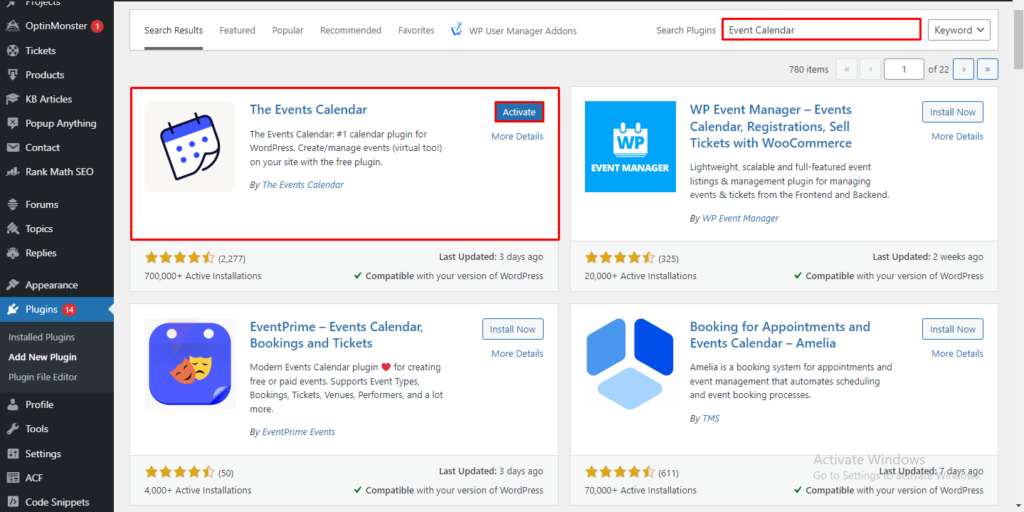
- Navigate to Plugins > Add New.
- Search for “Events Calendar” by Modern Tribe.
- Click Install and Activate the plugin.
Once activated, the Events Calendar menu will appear in your WordPress dashboard. Picture instructions: Take a screenshot of the WordPress dashboard with the Events Calendar highlighted for easier identification.
Step 2: Configuring the Events Calendar Plugin Settings
After installation, it’s time to set up the Events Calendar to suit your needs. Navigate to Events > Settings in the dashboard.
General Settings
- Date & Time Formats: Customize based on your target audience’s location (e.g., 24-hour format for a global audience or 12-hour format for the U.S.).
- Currency: If you’re using ticketing features, select the appropriate currency.
Display Settings
- Calendar View: Choose between list, month, or day views.
- The Events Calendar Override Template: Adjust templates to match your theme. You can locate this option under Display Settings for easy layout customization.
Step 3: Creating Your First Event
Once setup is complete, you’re ready to create your first event.
Event Creation Steps
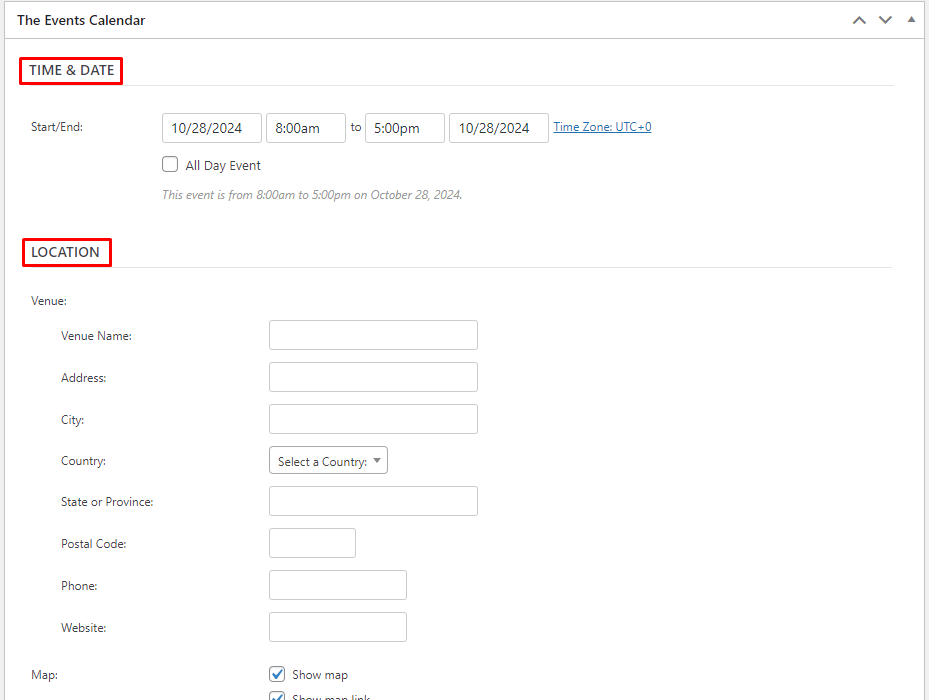
- Go to Events > Add New in the dashboard.
- Enter Event Title, Date, and Time.
- Add Location and Organizer details.
- Event Description: Provide a detailed overview to inform your audience about the event.
Using event categories and tags helps organize events for easier browsing. Categories might include “webinars,” “workshops,” or “networking.”
Step 4: Adding Additional Details and Tickets to Events
Adding Additional Details
- Event Descriptions: Provide specifics about speakers, agenda, or event format.
- Images: Add relevant images to give your events visual appeal.
Tickets and Recurring Events
If using a premium add-on, you can add ticketing options directly in the event editor. Set ticket limits, pricing, and availability.
For recurring events (such as weekly webinars or monthly team meetings), you can set up schedules in the event editor to avoid recreating each session individually.
Step 5: Displaying Events on Your Website
The Events Calendar plugin offers various ways to showcase your events on your site, making it easy for visitors to see upcoming activities.
Adding Calendar to Your Website
- Add the calendar to a specific page using a shortcode or select a dedicated page from the Events Calendar settings.
- You can also add the calendar to the sidebar or footer using a widget.
Customizing Display
To ensure brand consistency, adjust the calendar’s colors and fonts. This can be done through the Display Settings to match your website’s look and feel.
SEO Tips for Event Pages
Proper SEO optimization will help your event pages rank higher in search results, driving more traffic to your site.
Optimizing Titles, Descriptions, and Tags
- Use Descriptive Titles: Ensure each event title includes keywords and describes the event clearly.
- Add Relevant Tags and Categories: Helps search engines understand your content’s focus.
- Schema Markup: Using structured data markup can improve how Google displays your events, making them more visible to searchers.
Encourage User Interaction
Add social media sharing options and link to related blog posts. This can increase engagement and time on page, both of which are favorable for SEO.
Troubleshooting Common Issues with the Events Calendar
Common Errors
If events aren’t displaying correctly, check that the plugin is compatible with your theme and other plugins. Also, make sure that your WordPress installation is up-to-date.
Support Options
The plugin’s support page and community forums are excellent resources for troubleshooting. For advanced users, the events calendar override template can help resolve compatibility issues by customizing how events appear.
Integrating with Calendly for Interactive Scheduling
For businesses that require more scheduling flexibility, such as private consultations or one-on-one bookings, consider integrating Calendly. Learn how to create Calendly events and link them within your WordPress site. With a Calendly integration, visitors can book available times directly, which is especially useful for client consultations or personal events.